

NumChum-II, Ricoh ThetaS & cheap-ass tripod.
Part Two: Deliverables
Hey folks, sorry to not get things pasted last week, on schedule. The irony is that I was actually done and on schedule with the project, but was so excited to try the method on a different room, that I jumped right into starting a new project.
This project came together well, with some fails and foibles.
Attempt One:
So, I have one camera, as I mentioned, that I used for the lion’s share of the work. I ended up shooting footage from my phone, and my Nikon D7000 stayed on the sidelines. So, there’s my amazing and high-tech rig a the top of the page. I’ll wait if you need to scroll up to admire its complexity and simple beauty. Simple, but nothing in VR is simple.
Yes, a ThetaS on a cheap-ass $15 tripod that I carried on the PCT with me for a while before deciding that it was too heavy and sending it home (after having lost NumChum-MarkOne, my original ThetaS). The thought was that I could generate some stereo depth with a few turns of the camera, much like I had done with the test footage I spoke of that came from 6 GoPros.
My first try involved turning the camera only about 15 degrees each time. I figured it would be enough info. I also captured an HDR from each camera position with HDR360 just in case I might need it.
Then I had to figure out how to get the footage into Nuke and work with the camera solver.
When the ThetaS captures video, it does so from each lens independently and the you stitch them together in Ricoh’s Spherical viewer program, which stitches and prepares the files for viewing. I opted to take the “raw” video from the video file, which has each lens independent, then Crop & Transform in Nuke to plug it in as different cameras in Nuke. So, I ended up with Camera 1-6, one view from each shot (Shot 01=Cam01/04, Shot 02= Cam 02/05, Shot 03=Cam03/Cam06). I got those laid out in Nuke and went for the solve.
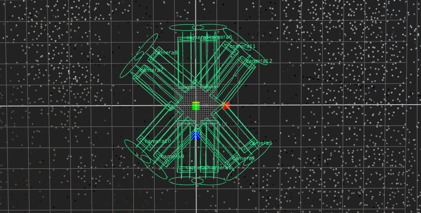
When I put that into my probability matrix (i.e. Nuke’s CaraVR Toolset), I got a solve – a stereo solve even – but it was basically crap: I could see my cameras in 3D, but there was a huge gap between them:

Camera Solve. #fail
That made for a lousy stitch, since although the Ricoh does a full 360 each time, I was trying more or less to reinvent the wheel because I didn’t yet know how to turn a LatLong into two spherical images from the ThetaS.
I ended up just putting two cameras into the view and made a final VR video but the depth info was just not there.
Attempt Two
I decided that the footage I shot would need to be reshot if I wanted to refine the workflow, so I went back to it. I used my iPhone’s Compass app to turn the head of the tripod 60 degrees each time. I figured that would give me 6 fisheye shots that could more easily be solved. I deleted and reshot during, realizing that if I had the camera offset at all on the tripod head form the axis of rotation, that my cameras would be in a crescent configuration for the solve. I opted for a tight circular pattern and reshot, with HDR’s at each position, again.
This time, things solved better in Nuke. I played around a lot with settings to see if using a Nodal or Spherical setup would solve better in CaraVR. I opted in the end for Spherical even though it took a bit longer, because the solve seemed more solid. I set my convergence at 1.3 (more or less the average distance to camera in the room) and my rig size to 0.065 (ostensibly pupillary width).
My first time through, I was setting up a C_CameraSolver node and indicating Stereo there. I was getting the cameras I needed, and then shoving that into a C_Stitcher node, where I also specified Stereo, so I ended up with something like 24 views and a huge overhead of lag-time. Only later would I realize that I could solve the cameras in mono, then add Stereo in the stitch (see next post).
After much fiddling around, including finding the magic camera and rig setup, and fiddling with the stitch and such, then using a reformat to get to a 2K size and render out and OU3D, I had another video, but then had to go do some reading on how to properly upload this to YouTube. It turns out that you need to inject some metadata into the files to get them marked as VR/Stereoscopic. It’s a client-side app, available for free.
Luckily, a day before (Amazon Prime shipping, baby) I had ordered a couple Google Cardboard viewers and was able to view things after uploading to YouTube. I was pleased with the output and called the project done, 2017.02.13… but I immediately started shooting video on my lower level and neglected my duties as a Blogger, thereby heading down the rabbit hole and starting the next project.
The final output of each attempt is here:
Attempt One: https://youtu.be/LPIDiFMyKh8
Attempt Two: https://youtu.be/8Mk02p_7BJc
Conclusions:
File under obvious, but VR is hard. Stereo is hard. Put the two together and you’ve got a lot of technical stuff to sort through. I learned a lot about workflow and how best to capture shots, but I’ve been haunted of dreams (literal dreams) in which I keep trying to figure out how to convert a LatLong into two camera views for use with the Nuke CaraVR tools, since it only accepts Fisheye or Rectilinear input. I did try trying to trick it by injecting metadata and stuff, but that’s prt of the next project, trying to get a good shot of my downstairs, which has more depth and interesting things to look at.
My final movie has everything I wanted: 3D depth and immersion. It’s also on YouTube and it also needed some cleanup in the way of paint work that I opted not to go back and do – to leave my seams and my tripod remnants and just call it good. Next project will be cleaner.
I also want to be able to find a way to use my 360 stills (HDR’s) from the Theta to create Stereoscopic VR somehow, since the resolution of stills on the ThetaS is much higher than the video and I’m more or less using a still shot anyway. The only reason I am using the video is because I have individual access to the output from each lens.
Stretch Goal:
I didn’t get anywhere near my stretch goal. I did start mapping out the bathroom in 3D, but I wasn’t really able to get good enough geo for projecting onto, except for major landmarks like walls. I’ll have to reconsider this.
Until next time!